Announcing Genkit Dart: Build full-stack AI apps with Dart and Flutter
Announcing the preview launch of Genkit Dart, an open-source AI framework for building full-stack, AI-powered apps for any platform.
The Dart and Flutter communities have always pushed the boundaries of what’s possible across screens. You’ve shown that building high-quality, multi-platform applications doesn’t require compromising on developer experience. Now we’re bringing the same “write once, run anywhere” philosophy to AI-powered features and applications.
We are thrilled to announce the preview launch of Genkit Dart, an open-source AI framework for Dart and Flutter developers. Already available for TypeScript, Go, and Python, Genkit now empowers you to build high-quality, full-stack, AI-powered applications for any platform.
Why choose Genkit Dart?
#Genkit Dart provides you with the following capabilities:
-
Model-agnostic API: Supports Google, Anthropic, OpenAI, and OpenAI API-compatible models out-of-the-box. You’re never locked into a single provider.
-
Type safety: Uses Dart’s strong type system with the
schemanticpackage to generate strongly typed data and create type-safe AI flows. -
Run code anywhere: Write your AI logic once and run it as a backend service or directly inside your Flutter app.
-
Developer UI: Includes a localhost web UI where you can test prompts, view traces, and debug your flows.
-
Complete AI toolkit: Provides everything you need to build high-quality AI features, including structured output, tools, multi-step flows, observability, and more.
Model-agnostic API
#Genkit is designed to support any LLM provider, with out-of-the-box support for Google, Anthropic, OpenAI, and OpenAI API-compatible models in this release. This lets you switch between providers with minimal code changes.
import 'package:genkit/genkit.dart';
import 'package:genkit_google_genai/genkit_google_genai.dart';
import 'package:genkit_anthropic/genkit_anthropic.dart';
void main() async {
// Initialize Genkit with plugins
final ai = Genkit(plugins: [
googleAI(),
anthropic(),
]);
// Call Google Gemini
final geminiResponse = await ai.generate(
model: googleAI.gemini('gemini-3.1-pro-preview'),
prompt: 'Hello from Gemini',
);
// Call Anthropic Claude
final claudeResponse = await ai.generate(
model: anthropic.model('claude-opus-4.6'),
prompt: 'Hello from Claude',
);
}
Type-safe AI flows
#Genkit lets you wrap your AI logic into testable, observable, deployable functions called flows.
Here is an example of a Travel Planner flow using strongly-typed input and output schemas, with tool calling:
import 'package:genkit/genkit.dart';
import 'package:genkit_google_genai/genkit_google_genai.dart';
import 'package:schemantic/schemantic.dart';
part 'travel_flow.g.dart';
// Define flow input schema with schemantic
@Schema()
abstract class $TripRequest {
String get destination;
int get days;
}
// Define tool input schema
@Schema()
abstract class $WeatherRequest {
@Field(description: 'The city name')
String get city;
}
void main() async {
// Initialize Genkit and register the Google AI plugin
final ai = Genkit(plugins: [googleAI()]);
// Define a tool the model can invoke to fetch live data
ai.defineTool(
name: 'fetchWeather',
description: 'Retrieves the current weather forecast for a given city',
inputSchema: WeatherRequest.$schema,
fn: (request, _) async => request.city.toLowerCase() == 'seattle' ? 'Rainy' : 'Sunny',
);
// Construct a strongly-typed, observable flow
final tripPlannerFlow = ai.defineFlow(
name: 'planTrip',
inputSchema: TripRequest.$schema,
outputSchema: .string(),
fn: (request, _) async {
// Generate content using the model and tool
final response = await ai.generate(
model: googleAI.gemini('gemini-3.1-pro-preview'),
prompt: 'Build a ${request.days}-day travel itinerary for ${request.destination}. '
'Make sure to check the weather forecast first to suggest appropriate activities.',
toolNames: ['fetchWeather'],
);
return response.text;
},
);
// Run the flow
final itinerary = await tripPlannerFlow(
TripRequest(destination: 'Seattle', days: 3)
);
print(itinerary);
}
When you’re ready, you can easily expose your flow as an API using the genkit_shelfpackage and deploy it to any platform that supports Dart.
import 'package:genkit_shelf/genkit_shelf.dart';
import 'package:shelf_router/shelf_router.dart';
import 'package:shelf/shelf_io.dart' as io;
void main() async {
// ... initialize Genkit and define tripPlannerFlow ...
final router = Router()
..post(
'/api/planTrip',
shelfHandler(tripPlannerFlow),
);
await io.serve(router.call, 'localhost', 8080);
}
Run anywhere Dart runs
#Most complex AI logic runs on a server. However, because Dart works on both the frontend and backend, Genkit lets you easily move your AI code between your server and your Flutter app.
Here are a few ways you can build with Genkit Dart:
1. Entirely in Flutter for prototyping
#You can write all of your Genkit logic, including model calls, directly in your Flutter app. This is great for prototypes or apps where users provide their own API keys and prompts aren’t private.
Warning: You should never publish an app with your API key embedded in the source code as it can be extracted and used by others.
2. Call backend flows from Flutter
#When your prompts are sensitive or your AI logic is complex, you can move the entire flow to your backend. Your Flutter app can then call this flow by defining it as a “remote action”. Since the backend and frontend are both in Dart, they can share the same schemas for end-to-end type safety.
Here is an example showing how to call the Trip Planner backend flow we defined earlier from your Flutter app:
import 'package:genkit/client.dart';
import 'package:my_shared_models/models.dart'; // Shared schema
final tripPlannerFlow = defineRemoteAction(
url: 'https://your-server.com/api/planTrip',
inputSchema: TripRequest.$schema,
outputSchema: .string(),
);
final itinerary = await tripPlannerFlow(
input: TripRequest(destination: 'Tokyo', days: 5),
);
3. In Flutter with remote models
#To secure your API keys while keeping the core AI logic in your Flutter app, you can create a small Genkit backend that proxies requests to the model provider with custom authorization logic. The models exposed through this backend are remote models.
import 'package:genkit_google_genai/genkit_google_genai.dart';
import 'package:genkit_shelf/genkit_shelf.dart';
import 'package:shelf_router/shelf_router.dart';
import 'package:shelf/shelf_io.dart' as io;
// Backend securely proxies requests to the model
void main() async {
final geminiApi = googleAI();
final targetModel = geminiApi.model('gemini-3.1-flash-lite-preview');
final router = Router()
..post(
'/api/gemini-model',
shelfHandler(
targetModel,
// Insert custom authorization logic here
contextProvider: (req) async => {'customAuth': true},
),
);
await io.serve(router.call, 'localhost', 8080);
}
In your Flutter app, use the remote model instead of a direct model plugin, passing any headers your server needs. This saves you from exposing your API keys and gives you more control over request authorization.
import 'package:genkit/genkit.dart';
// Flutter app communicates with the proxy server
final ai = Genkit();
final secureModel = ai.defineRemoteModel(
name: 'secureModel',
url: 'https://api.yourdomain.com/api/gemini-model',
headers: (context) => {'Authorization': 'Bearer ${fetchSessionToken()}'},
);
final response = await ai.generate(model: secureModel, prompt: 'Write me a poem.');
Powerful tools for AI development
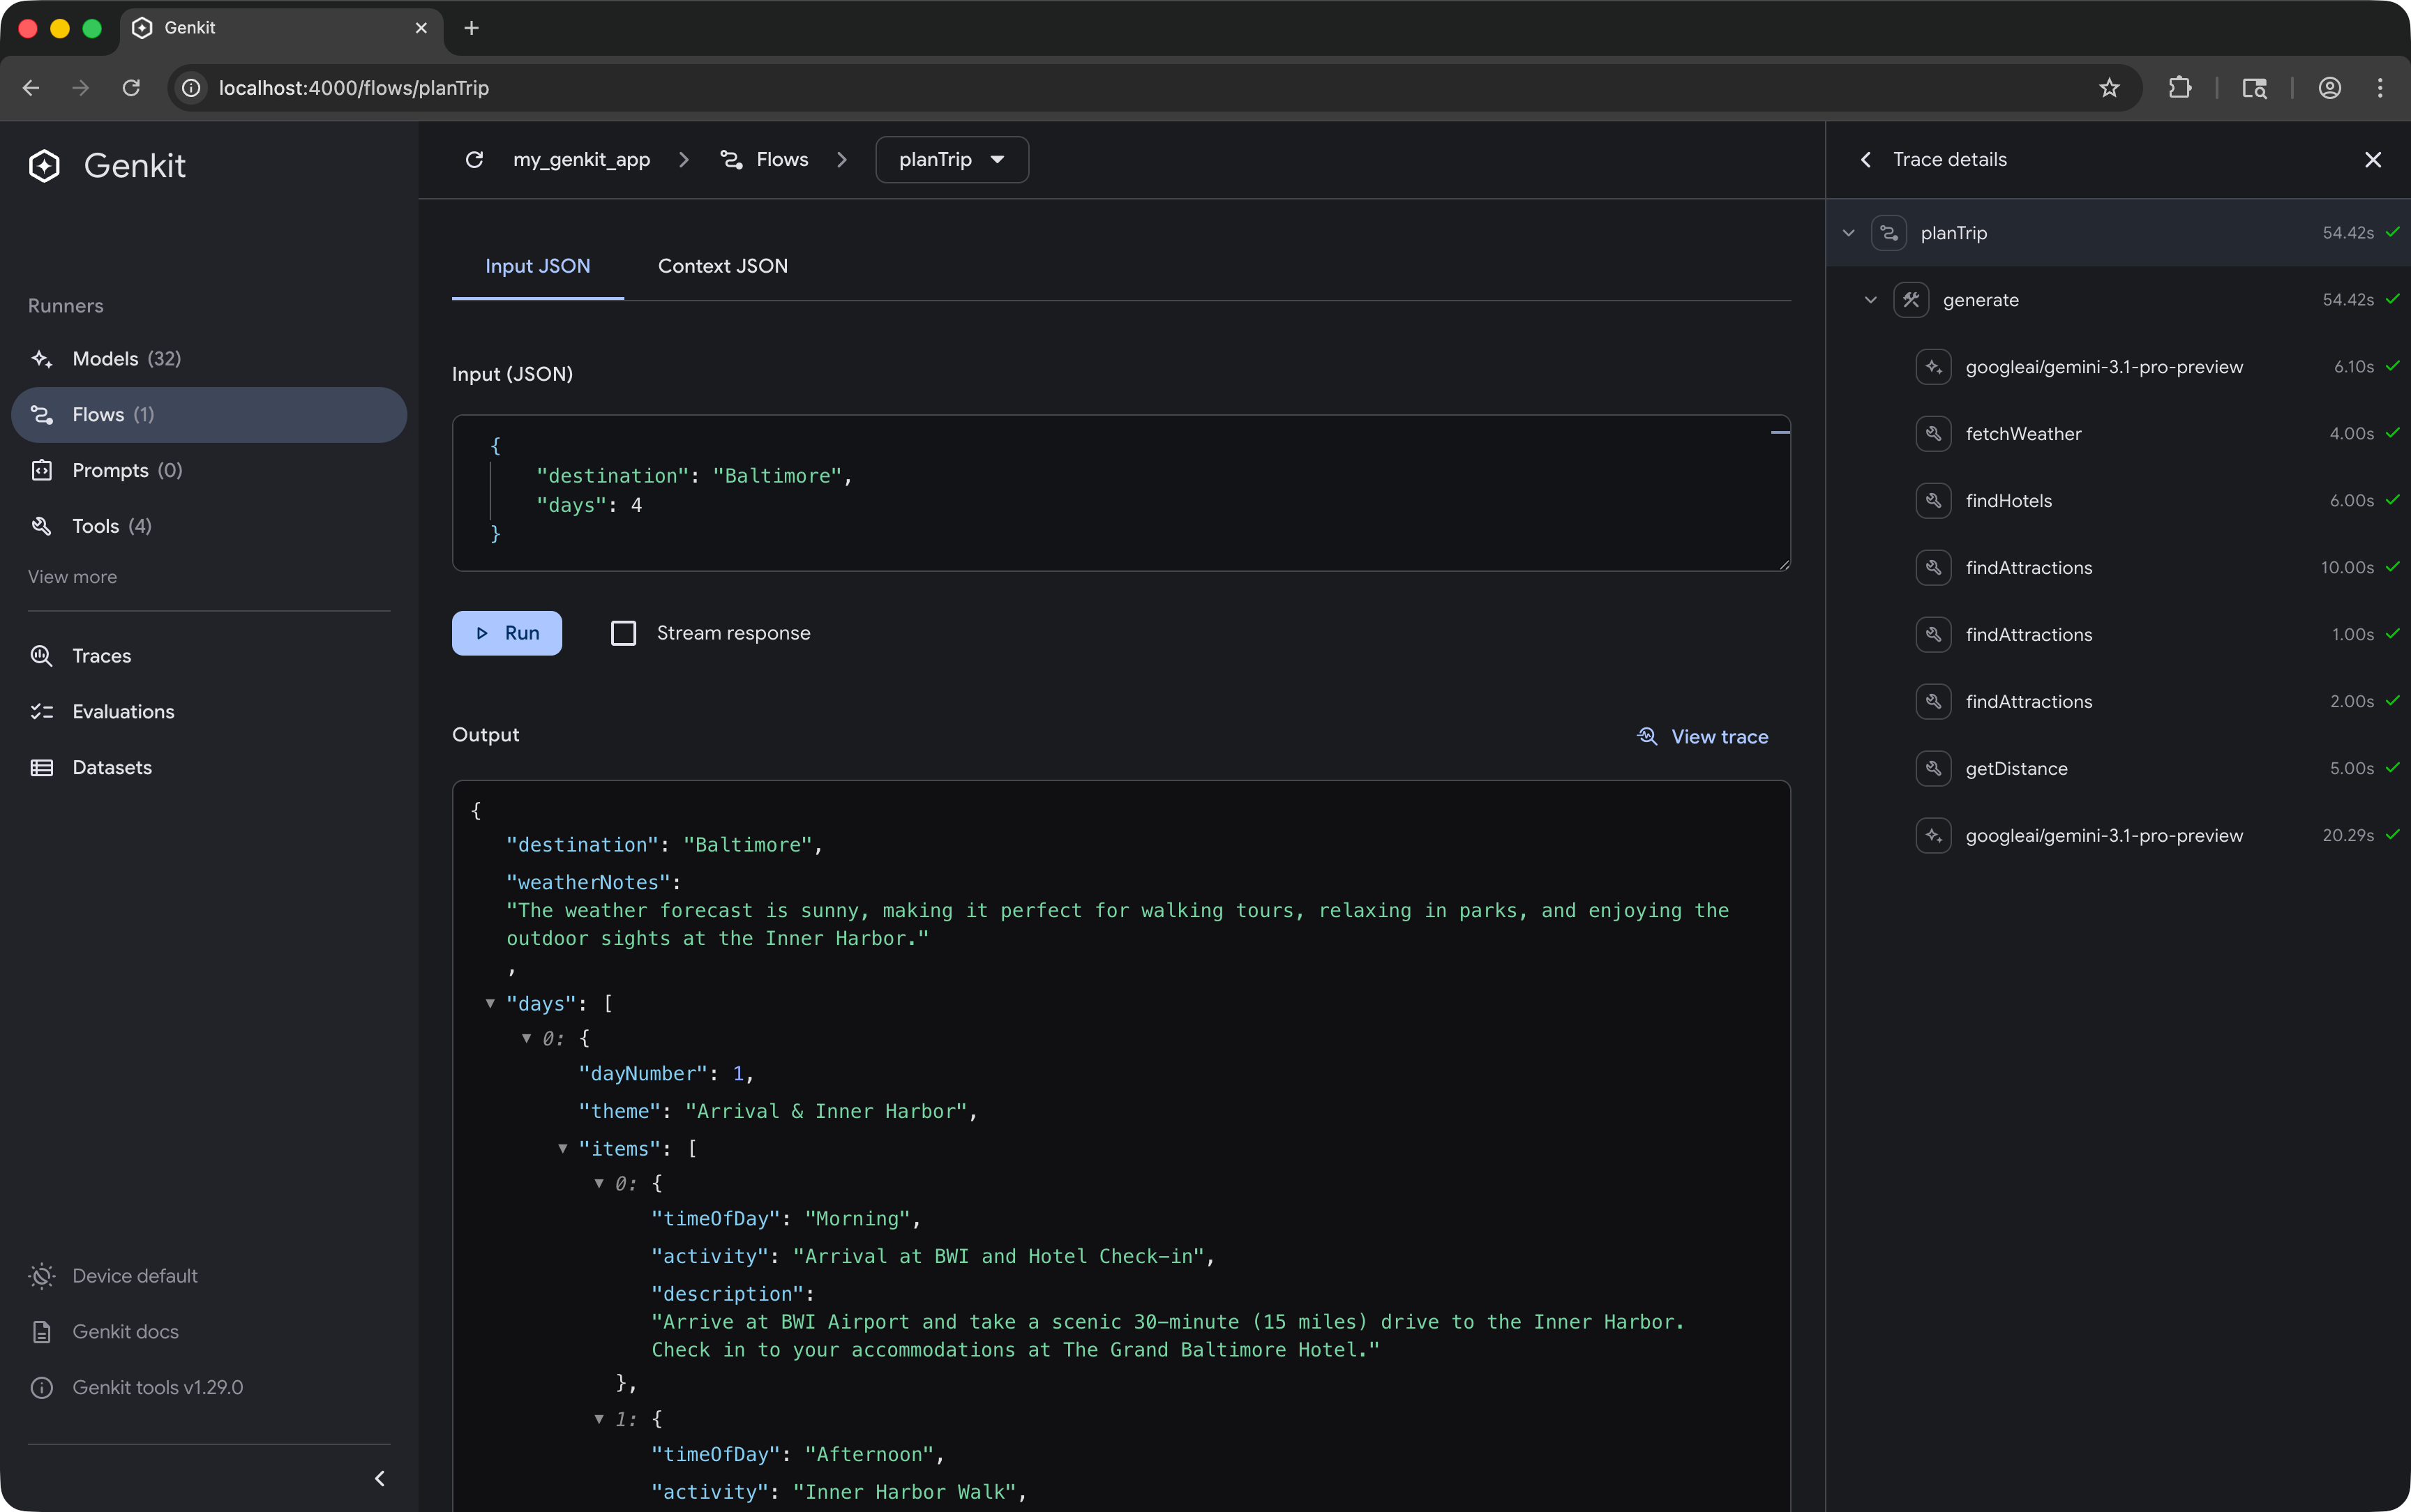
#Building high-quality AI applications requires thorough testing and continuous iteration to achieve reliable results. To help with this, Genkit provides a powerful local Developer UI.
You can start the Developer UI alongside your code by running your app with the Genkit CLI:
genkit start -- dart run bin/server.dart
Here is a look at testing a more advanced version of our Trip Planner flow in the Developer UI:
AI coding assistance
#For the best experience using Genkit Dart with AI coding tools like Antigravity, Gemini CLI, or Claude Code, install the Genkit Dart agent skill. This gives your AI assistant the knowledge to accurately write and debug your AI features.
Add the skill to your project:
npx skills add genkit-ai/skills
Learn more
#This release is an early preview. We want to work with Dart and Flutter developers to improve the framework. You can find the core packages and provider plugins on pub.dev today.
-
Get started: Read our quickstart guide.
-
Join the community: Join our Discord server to ask questions and chat with the team.
-
Give feedback: Open an issue on our GitHub repository to report bugs or request features.
We can’t wait to see what you build with Genkit Dart!